Loading an Expert Advisor into MetaTrader 4 involves more than copying a file. You need to enable automated trading, compile the EA, add the right symbols to your watchlist, configure the common settings, and set the input parameters. Miss one step and the EA either won't appear or won't trade.
This guide walks through every step in order.
Step 1 — Copy the Expert Advisor Files
Download the Expert Advisor package. It will typically contain one or more .ex4 files (compiled EAs) and possibly .mql4 source files. Keep them in an accessible folder on your computer — you will copy them into the MetaTrader directory in Step 4.
For BacktestMarket EAs specifically, the package also includes a drawdown folder containing .txt files where the EA logs its operations. This is used by the performance monitoring system — add it to the MQL4\Files directory inside your MT4 data folder.
Step 2 — Open MetaTrader 4
Launch MetaTrader 4. Make sure it connects to your broker's server successfully before proceeding.
Step 3 — Enable Automatic Trading
Look for the AutoTrading button in the top toolbar. When enabled, it appears green. If it is grey or off, click it to activate.
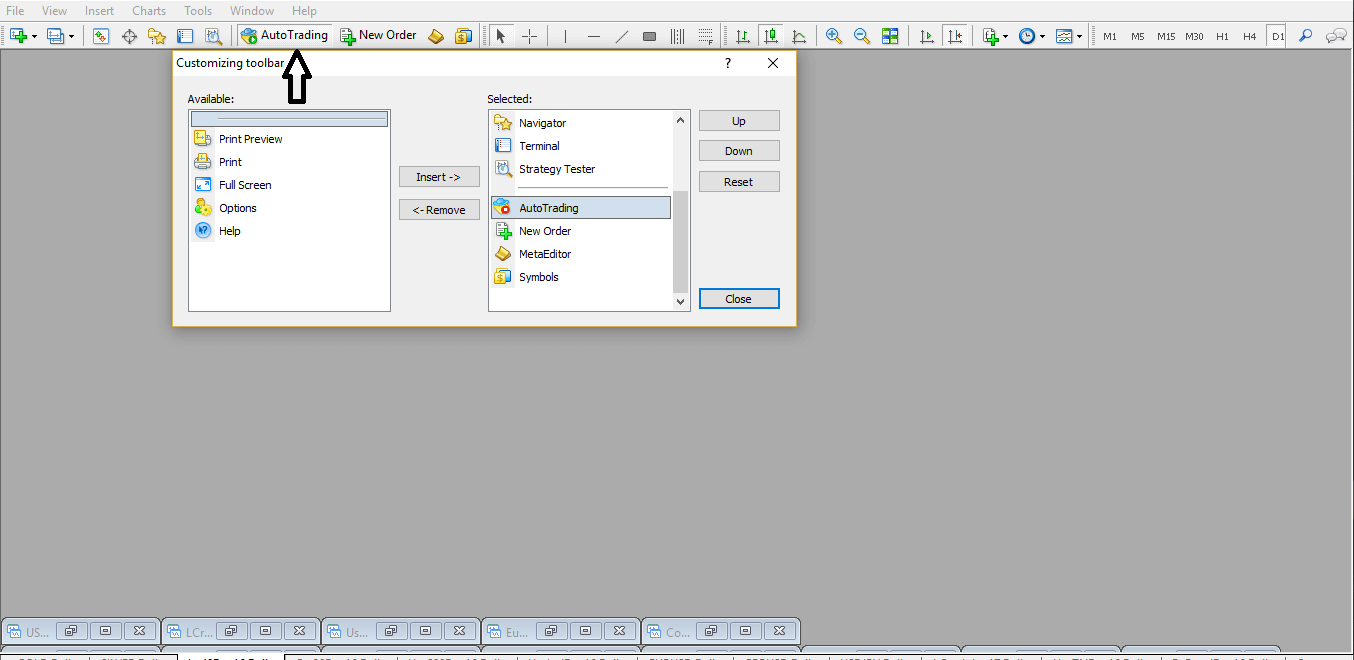
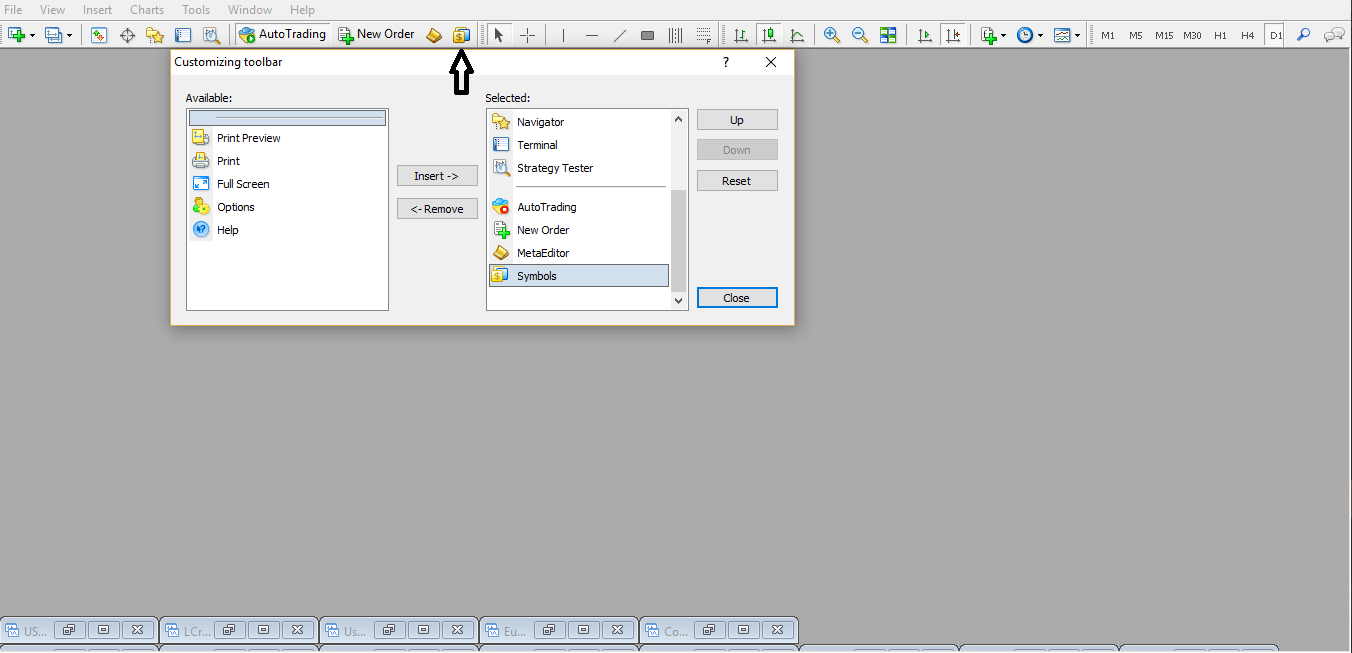
If you cannot see it in the toolbar, right-click the toolbar area, select AutoTrading, and click Insert to add it.
Step 4 — Open MetaEditor and Paste the EA Files
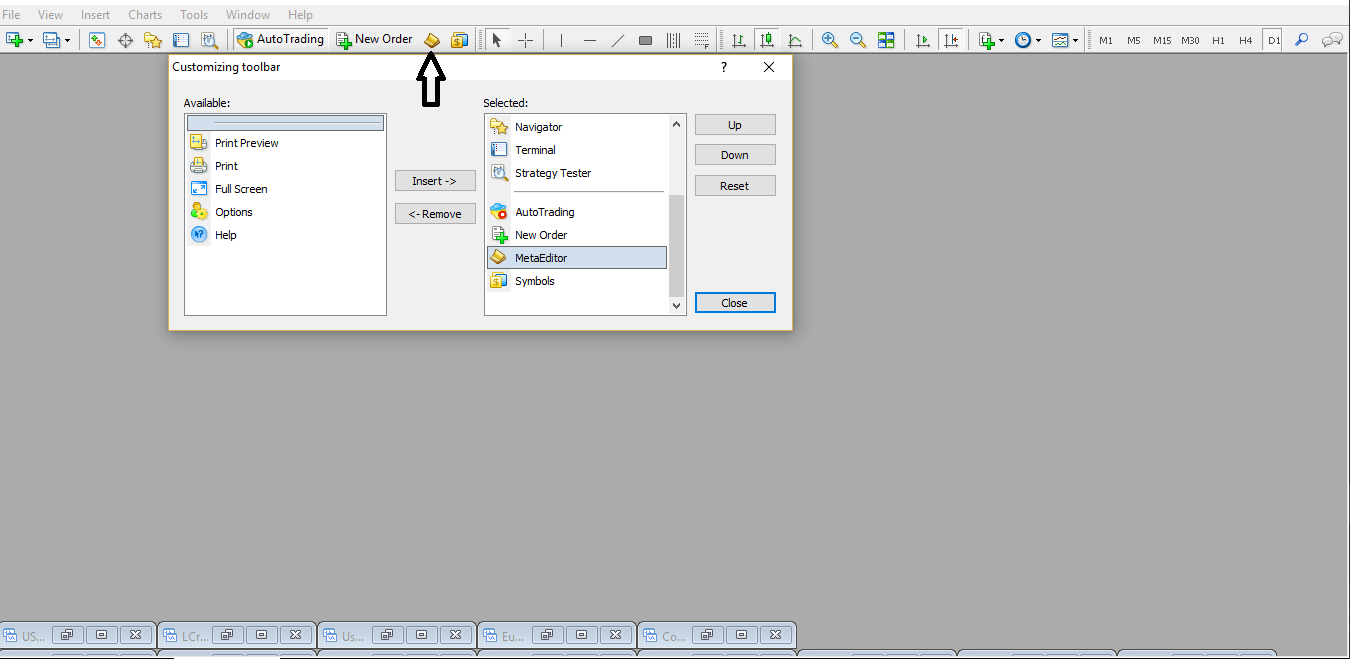
Click the MetaEditor button in the toolbar (the yellow notepad icon). Once MetaEditor opens:
In the Navigator panel on the left, find the Expert folder. Right-click it and select Open Folder:
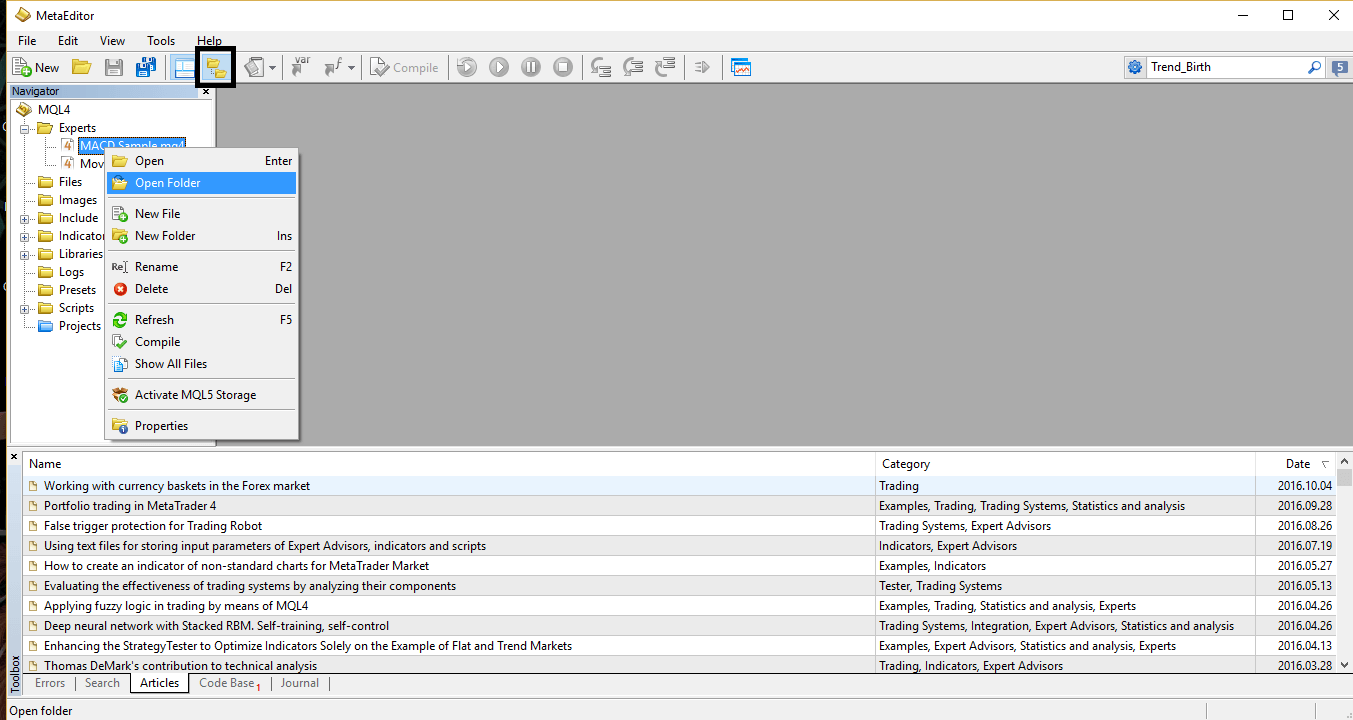
This opens the MQL4\Experts directory in Windows Explorer. Paste your .ex4 files here:
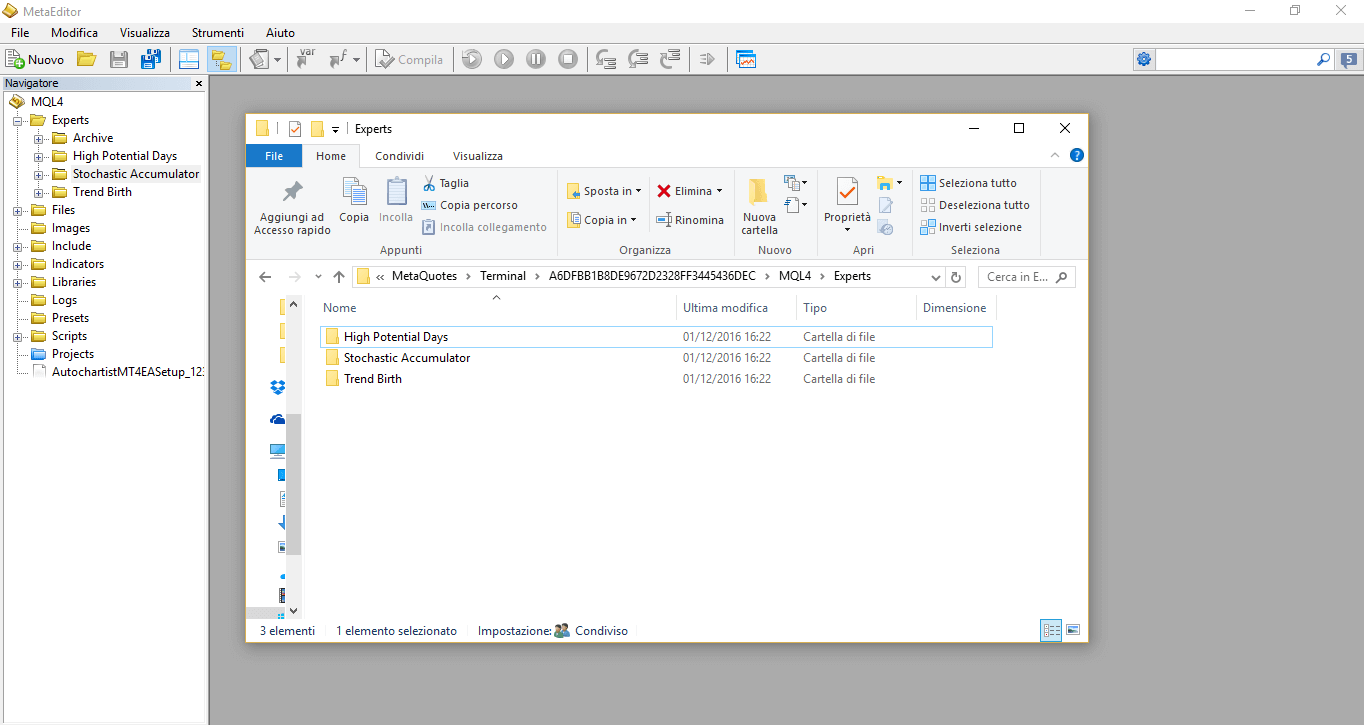
Tip: Create a desktop shortcut to this folder for faster access in the future.
After pasting the files, either close and reopen MetaTrader 4 (which triggers automatic compilation) or manually compile in MetaEditor by pressing F7.
Step 5 — Add Symbols to Market Watch
Your EA trades specific instruments. They must be visible in the Market Watch panel before you can open a chart for them.
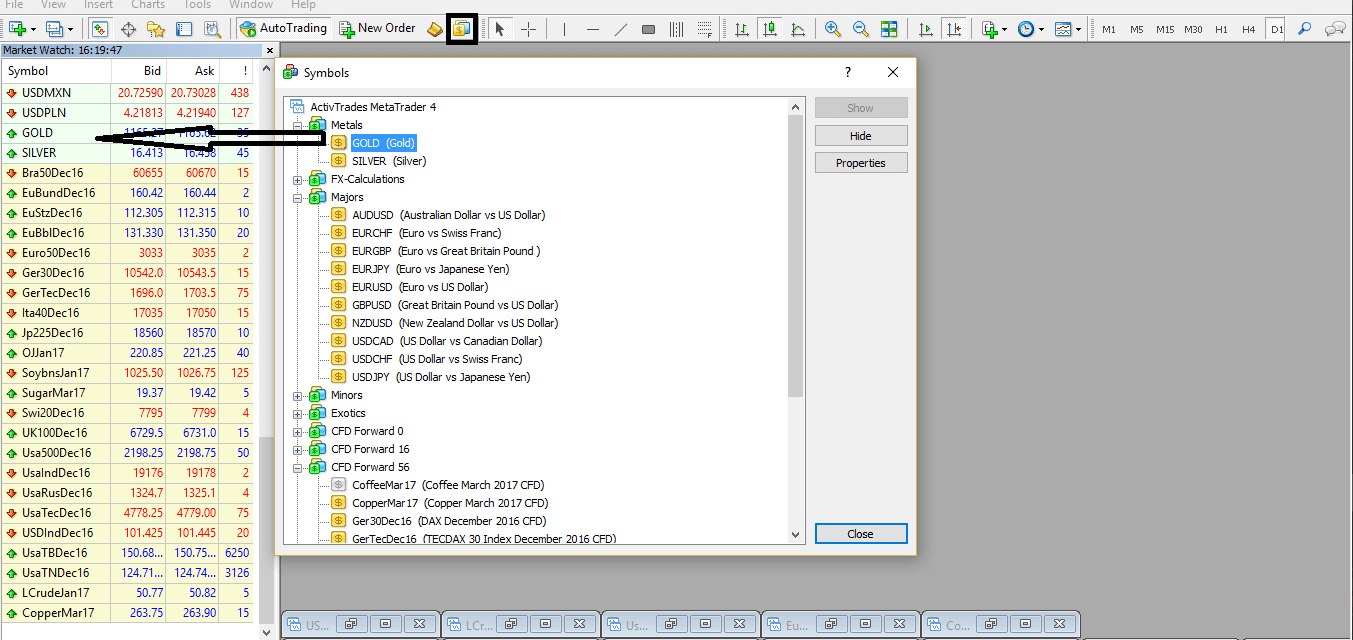
Open the Symbol List window (right-click Market Watch → Show All, or use View → Symbols):
Browse your broker's folder structure, find each symbol the EA needs, and double-click to add it to Market Watch:
Step 6 — Open a Chart and Attach the EA
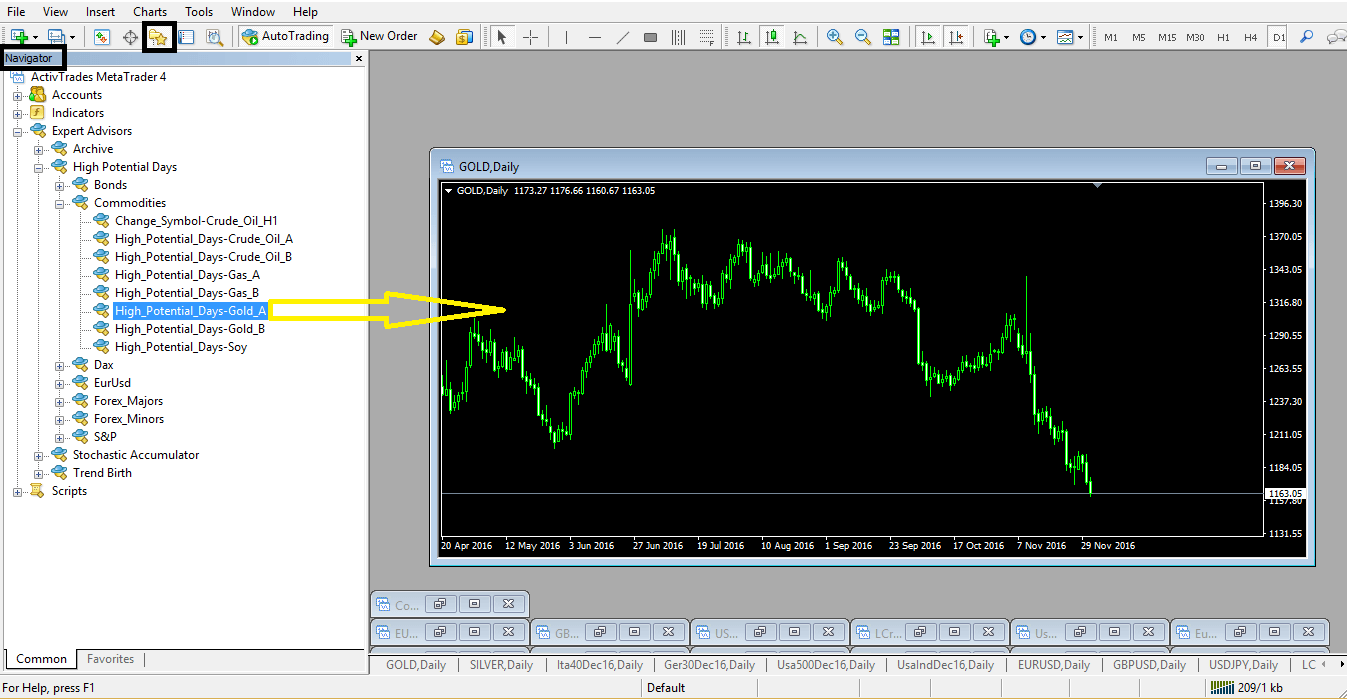
In the Navigator panel inside MetaTrader 4, expand the Expert Advisors section. Find your .ex4 file:
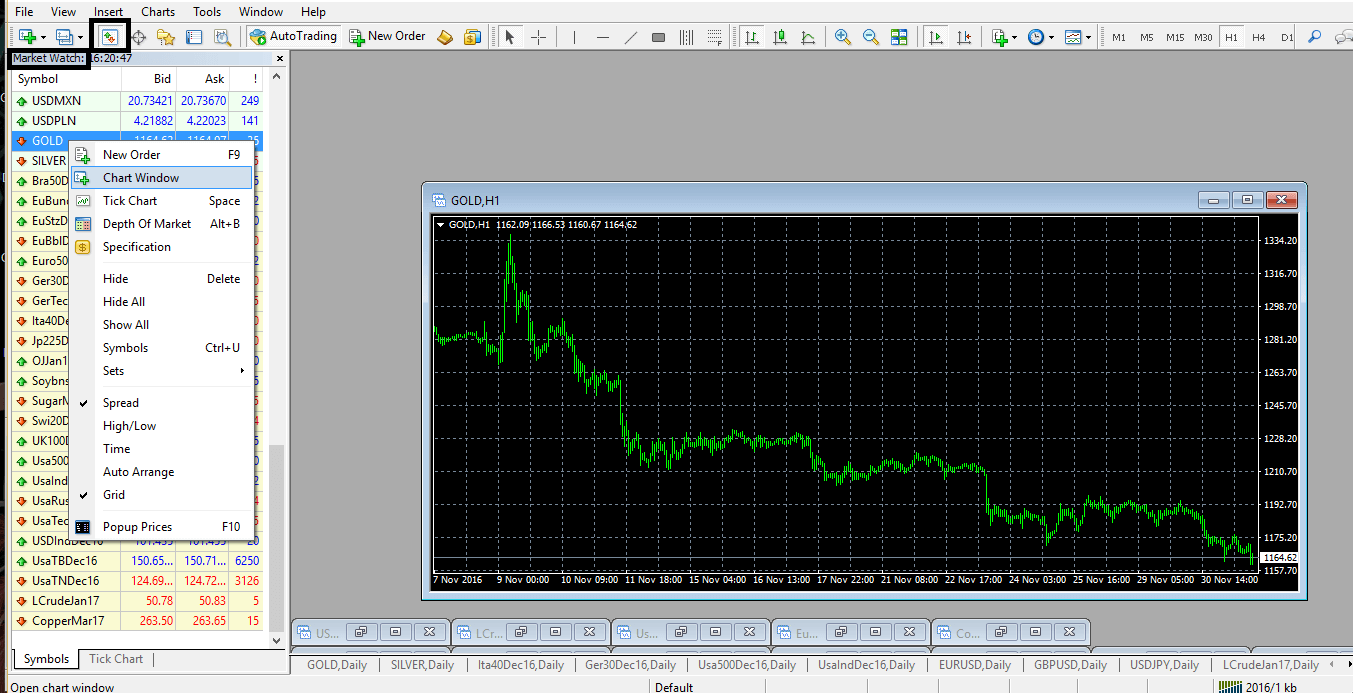
Either double-click it or drag it onto the chart you want the EA to trade on:
Step 7 — Configure Common Options
A settings dialog will appear. Switch to the Common tab:
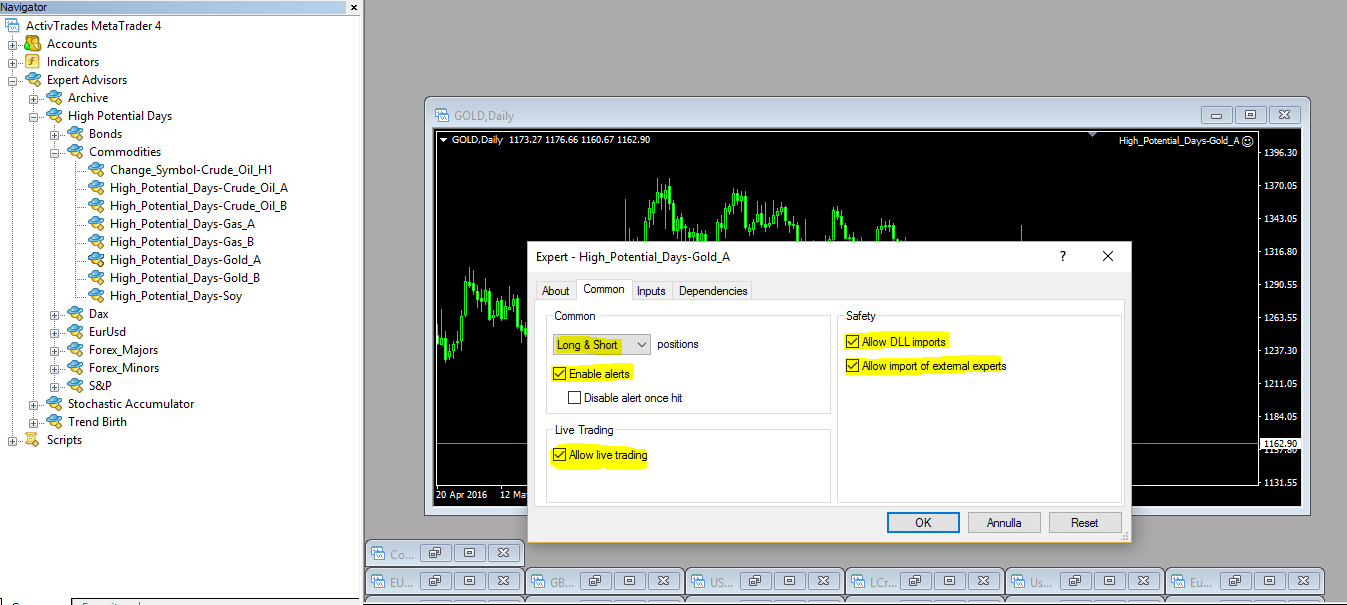
Make sure the following are checked:
- Allow Live Trading — required for the EA to place orders
- Long & Short positions allowed
- Allow DLL imports (if the EA uses external DLLs)
- Allow external expert imports
- Enable alerts
Click OK to proceed.
Step 8 — Configure Input Parameters
Switch to the Inputs tab to configure the EA's parameters:
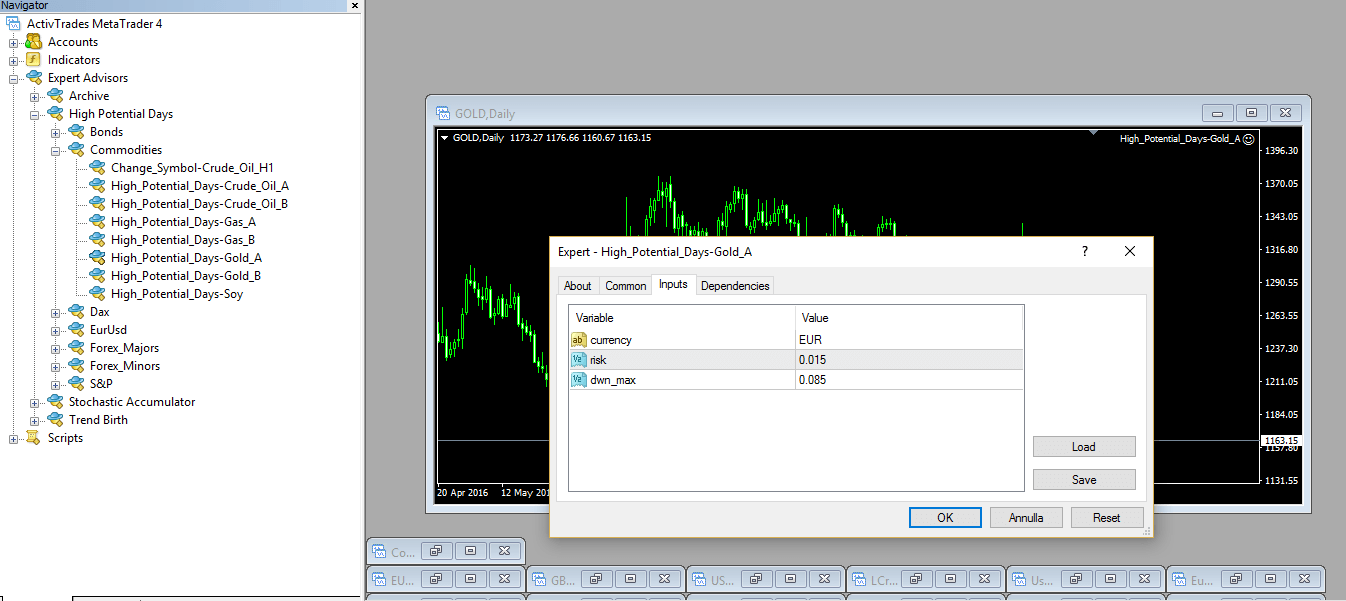
Key parameters for BacktestMarket Expert Advisors:
| Parameter | Backtest mode | Live mode |
|---|---|---|
backtest_mode | 1 | 0 |
risk per operation | your choice | max 1.5% of equity (default) |
max drawdown | your choice | set proportionally to risk |
For backtesting, set backtest_mode = 1. If your historical data is in a different timezone (for example, US futures data at GMT-6), apply the appropriate hour shift to align it with GMT+1.
For live trading, set backtest_mode = 0. The EA will log performance to the drawdown folder — this is the recording system that monitors real drawdown versus the configured maximum.
For instruments with contract rollover (futures CFDs), configure:
- CFD — the broker's symbol prefix (e.g.,
Dax30) - Month — the current contract month letter (F=Jan, G=Feb, H=Mar, J=Apr, K=May, M=Jun, N=Jul, Q=Aug, U=Sep, V=Oct, X=Nov, Z=Dec)
- Year_digits — the last digits of the contract year (e.g.,
17for 2017)
The EA concatenates these to build the full symbol name (e.g., Dax30Mar17). It automatically rolls to the next contract approximately 5 days before expiry.
Step 9 — Confirm the EA Is Active
After clicking OK, look at the top-right corner of the chart. A small face icon will appear:
- Smiling face ☺ — the EA is active and trading is enabled
- Frowning face ☹ — trading is disabled (check AutoTrading, Common settings, or broker connection)
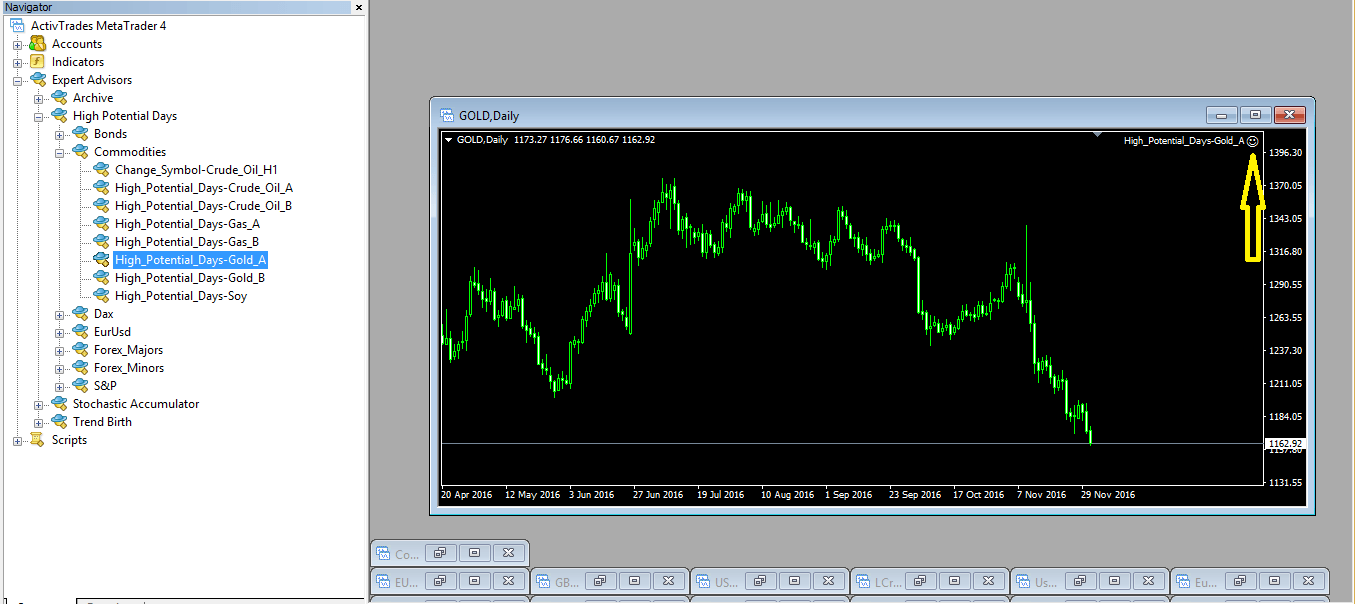
The smiling face is your confirmation that everything is configured correctly.
Step 10 — Monitor the Terminal
Check the Experts tab at the bottom of the MetaTrader terminal daily, particularly if you are not using a VPS:
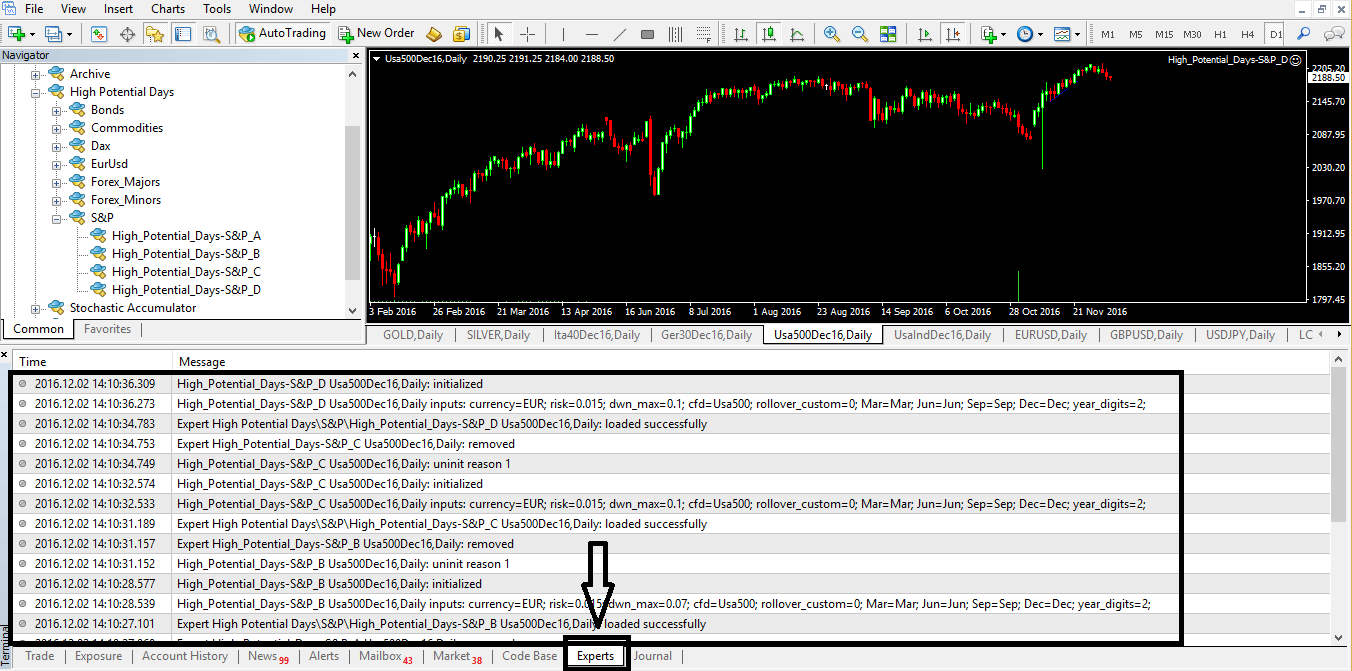
- Red circle icons indicate errors that need attention
- Yellow triangle icons are non-critical warnings
- Normal EA activity entries (orders opened, closed, etc.) appear as plain text
Step 11 — Set Up Automatic Contract Rollover
For BacktestMarket EAs that trade non-continuous CFDs (futures contracts that expire quarterly in March, June, September, and December), the automatic rollover system handles contract transitions:
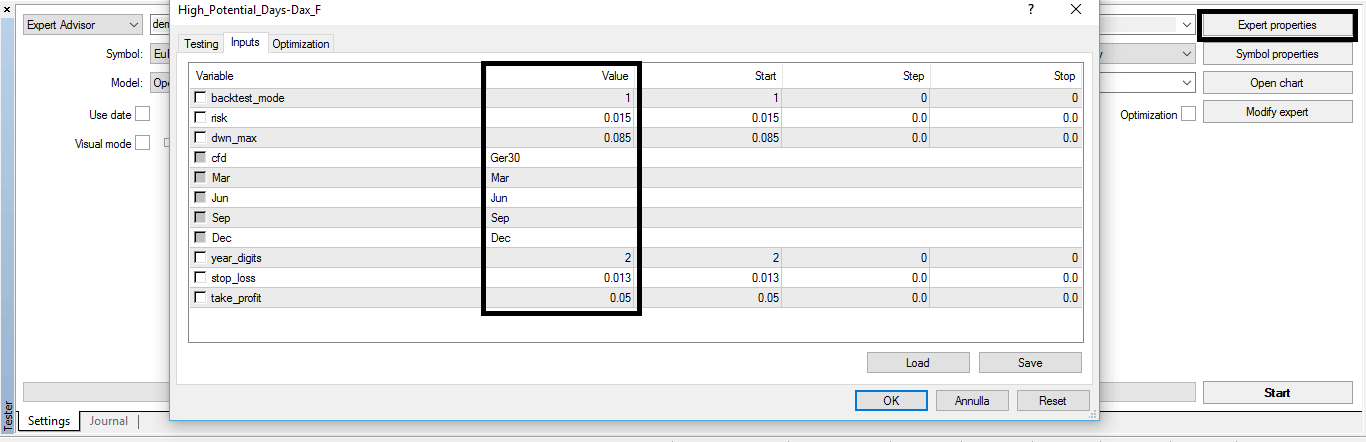
The EA monitors the current contract expiry and automatically reloads the chart with the next contract symbol approximately 5 days before expiration. Configure the CFD, Month, and Year_digits parameters as described in Step 8.
Summary
| Step | Action |
|---|---|
| 1 | Copy .ex4 files (and drawdown folder for BTM EAs) |
| 2 | Open MetaTrader 4 |
| 3 | Enable AutoTrading (green button) |
| 4 | Paste files into MQL4\Experts via MetaEditor |
| 5 | Add symbols to Market Watch |
| 6 | Open chart, drag EA onto it |
| 7 | Set Common options (Allow Live Trading) |
| 8 | Configure Input Parameters |
| 9 | Verify smiling face icon ☺ |
| 10 | Monitor the Experts tab in Terminal |
| 11 | Configure rollover for futures CFDs |
If you see a smiling face, your Expert Advisor is running. The next step is to understand how to evaluate its live performance — read How to Read a Backtest Report to understand what metrics to track.